> ## Documentation Index
> Fetch the complete documentation index at: https://docs.pdfnoodle.com/llms.txt
> Use this file to discover all available pages before exploring further.
# Configuring Google Cloud Storage
This guide walks you through creating your bucket, enabling HMAC authentication, assigning the correct IAM permissions, and adding your credentials to pdf noodle.
***
### 1. Create or Select Your GCS Bucket
If you don’t already have a bucket:
1. Go to Google Cloud Console → Cloud Storage → Buckets
2. Click Create
3. Choose:
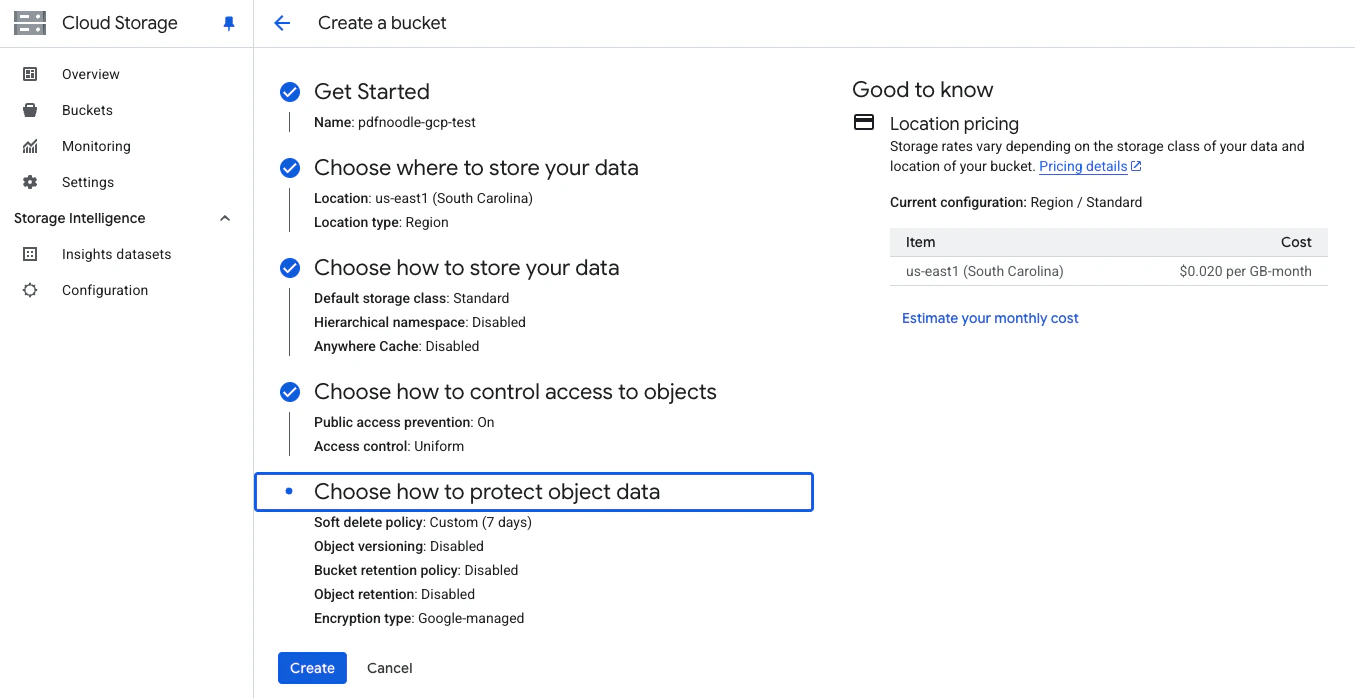
* **Bucket Name**: Your choice (I'm using `pdfnoodle-gcp-test`)
* **Location**: Region closest to your users
* **Storage class**: Standard (recommended)
* **Public access**: Prevent public access (ON)
* **Access control**: Uniform (required)
4. Finish creation
Here's how my final configuration looks like:
 **Important:** Uniform bucket-level access + public access prevention is the
recommended setup for private PDF storage with pdf noodle.
***
### 2. Create a service account
Now let’s set up the service account that pdf noodle will use when interacting with your Google Cloud Storage bucket. This account defines exactly what pdf noodle is allowed to do inside your bucket: uploading files, reading them back, or both.
If you already have a dedicated service account for storage operations, **feel free to move on to the next step.**
**Here's how to do it:**
1. Go to Google Cloud Console → IAM & Admin → Service Accounts
2. Click Create Service Account
3. Enter a name (e.g., pdf-noodle-storage) and click Create and Continue
4. Assign the required permissions:
#### Upload-only (maximum privacy)
Choose this if you want pdf noodle to upload files but never read them.
Add the role:
```
Storage Object Creator
```
#### Upload + Read (full integration)
Choose this if you want pdf noodle to upload, read, or validate files.
Add both roles:
```
Storage Object Creator
Storage Object Viewer
```
**Important:** This guide uses `Storage Object Creator` under the assumption
that you *won’t* be overwriting files with the same key (filename). If your
workflow requires pdf noodle to replace existing files, switch to `Storage
Object Admin` to avoid permission errors during upload.
Here's an example on how your Service Account Permissions should look like:
**Important:** Uniform bucket-level access + public access prevention is the
recommended setup for private PDF storage with pdf noodle.
***
### 2. Create a service account
Now let’s set up the service account that pdf noodle will use when interacting with your Google Cloud Storage bucket. This account defines exactly what pdf noodle is allowed to do inside your bucket: uploading files, reading them back, or both.
If you already have a dedicated service account for storage operations, **feel free to move on to the next step.**
**Here's how to do it:**
1. Go to Google Cloud Console → IAM & Admin → Service Accounts
2. Click Create Service Account
3. Enter a name (e.g., pdf-noodle-storage) and click Create and Continue
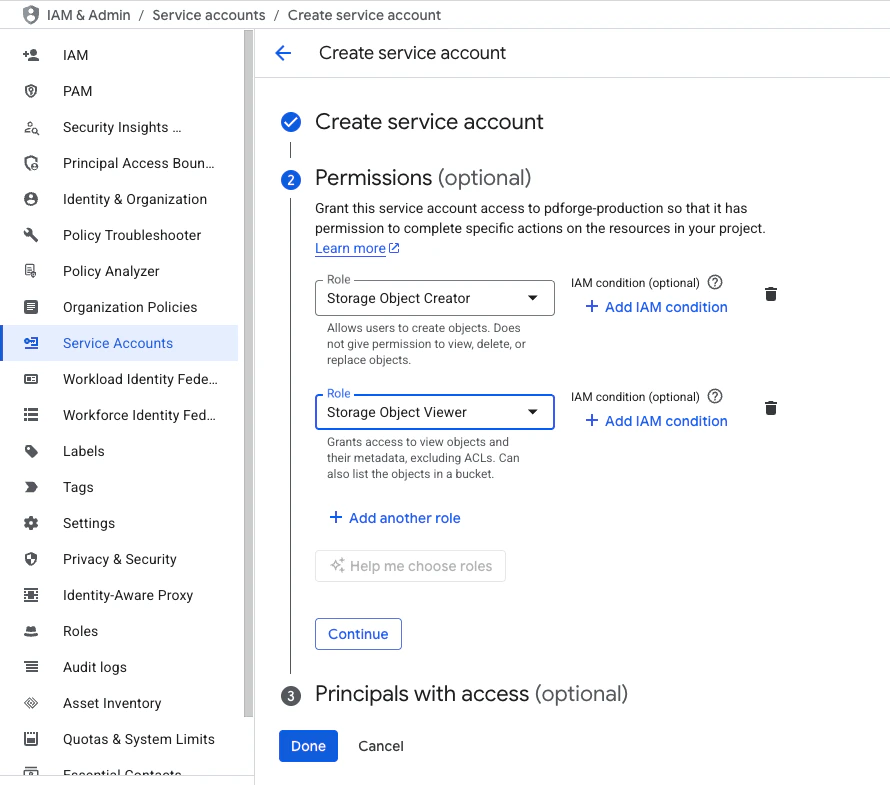
4. Assign the required permissions:
#### Upload-only (maximum privacy)
Choose this if you want pdf noodle to upload files but never read them.
Add the role:
```
Storage Object Creator
```
#### Upload + Read (full integration)
Choose this if you want pdf noodle to upload, read, or validate files.
Add both roles:
```
Storage Object Creator
Storage Object Viewer
```
**Important:** This guide uses `Storage Object Creator` under the assumption
that you *won’t* be overwriting files with the same key (filename). If your
workflow requires pdf noodle to replace existing files, switch to `Storage
Object Admin` to avoid permission errors during upload.
Here's an example on how your Service Account Permissions should look like:
 ***
### 3. Create Credentials and Grant Access to Your Bucket
Now that your service account is ready, you’ll generate the **HMAC access key and secret** that pdf noodle will use to communicate with Google Cloud Storage through the S3-compatible API.
***
### 3. Create Credentials and Grant Access to Your Bucket
Now that your service account is ready, you’ll generate the **HMAC access key and secret** that pdf noodle will use to communicate with Google Cloud Storage through the S3-compatible API.
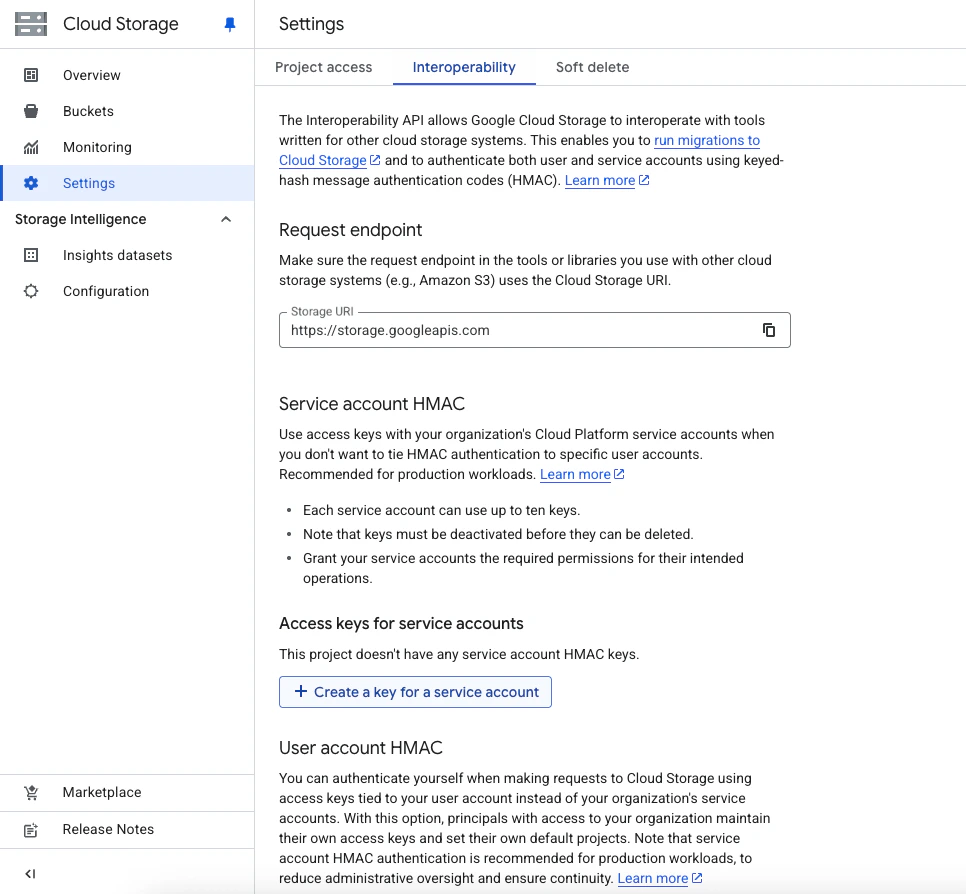 1. Go to Google Cloud Console → Cloud Storage → Settings → Interoperability
2. Scroll to the HMAC keys section
3. Click Create a key for a service account
4. Select the service account you just created
5. Click Create Key to generate your:
* **Access Key ID**
* **Secret Access Key**
These credentials allow pdf noodle to authenticate with your bucket using
S3-style requests. Make sure to store the secret key securely. It is only
shown once.
***
## 4. Add GCS Credentials to pdf noodle
1. Go to Google Cloud Console → Cloud Storage → Settings → Interoperability
2. Scroll to the HMAC keys section
3. Click Create a key for a service account
4. Select the service account you just created
5. Click Create Key to generate your:
* **Access Key ID**
* **Secret Access Key**
These credentials allow pdf noodle to authenticate with your bucket using
S3-style requests. Make sure to store the secret key securely. It is only
shown once.
***
## 4. Add GCS Credentials to pdf noodle
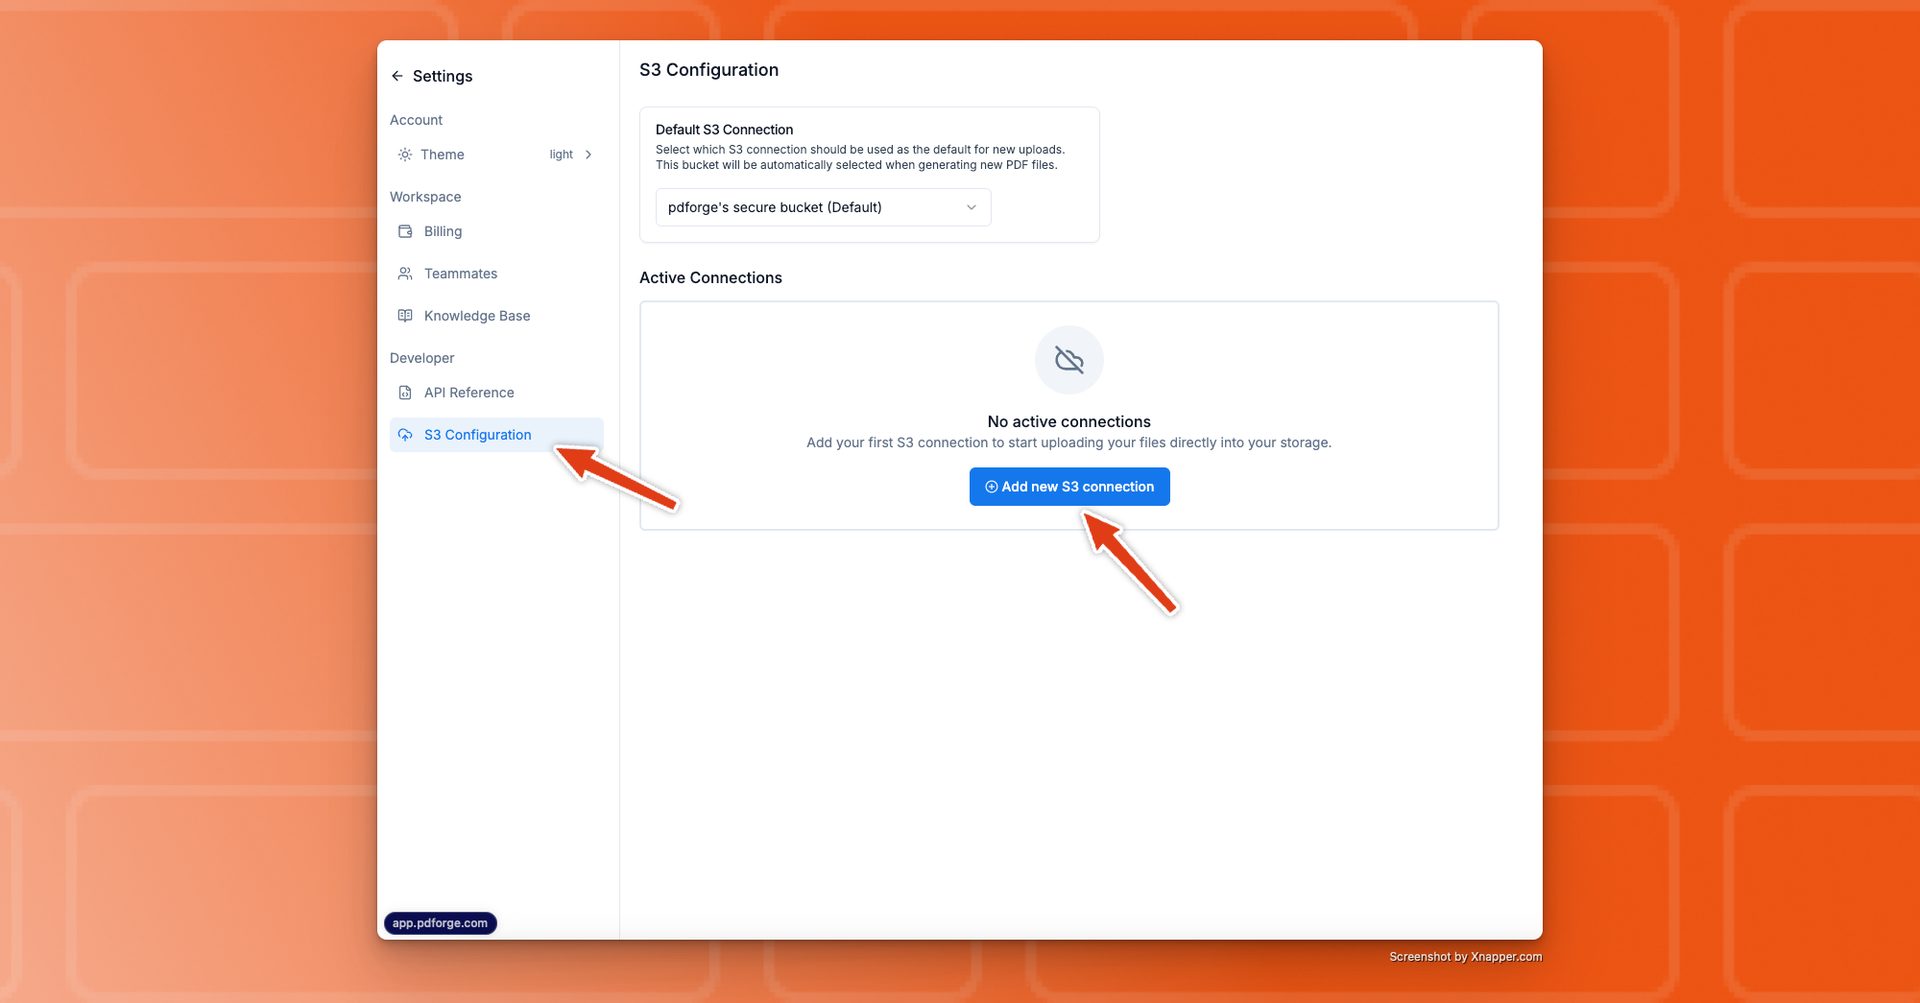 1\. In pdf noodle, go to Settings > S3 Configuration.
2\. Click Add S3 Connection, then enter:
* Provider: Google Cloud Storage
* Access Key and Secret Key
* Bucket Name
* *(Optional)*: Enable **Upload access only** if you don’t want pdf noodle to read from the bucket.
**Note:** With **Upload access only** enabled, we won’t return the file in the
API response—only its key.
1\. In pdf noodle, go to Settings > S3 Configuration.
2\. Click Add S3 Connection, then enter:
* Provider: Google Cloud Storage
* Access Key and Secret Key
* Bucket Name
* *(Optional)*: Enable **Upload access only** if you don’t want pdf noodle to read from the bucket.
**Note:** With **Upload access only** enabled, we won’t return the file in the
API response—only its key.
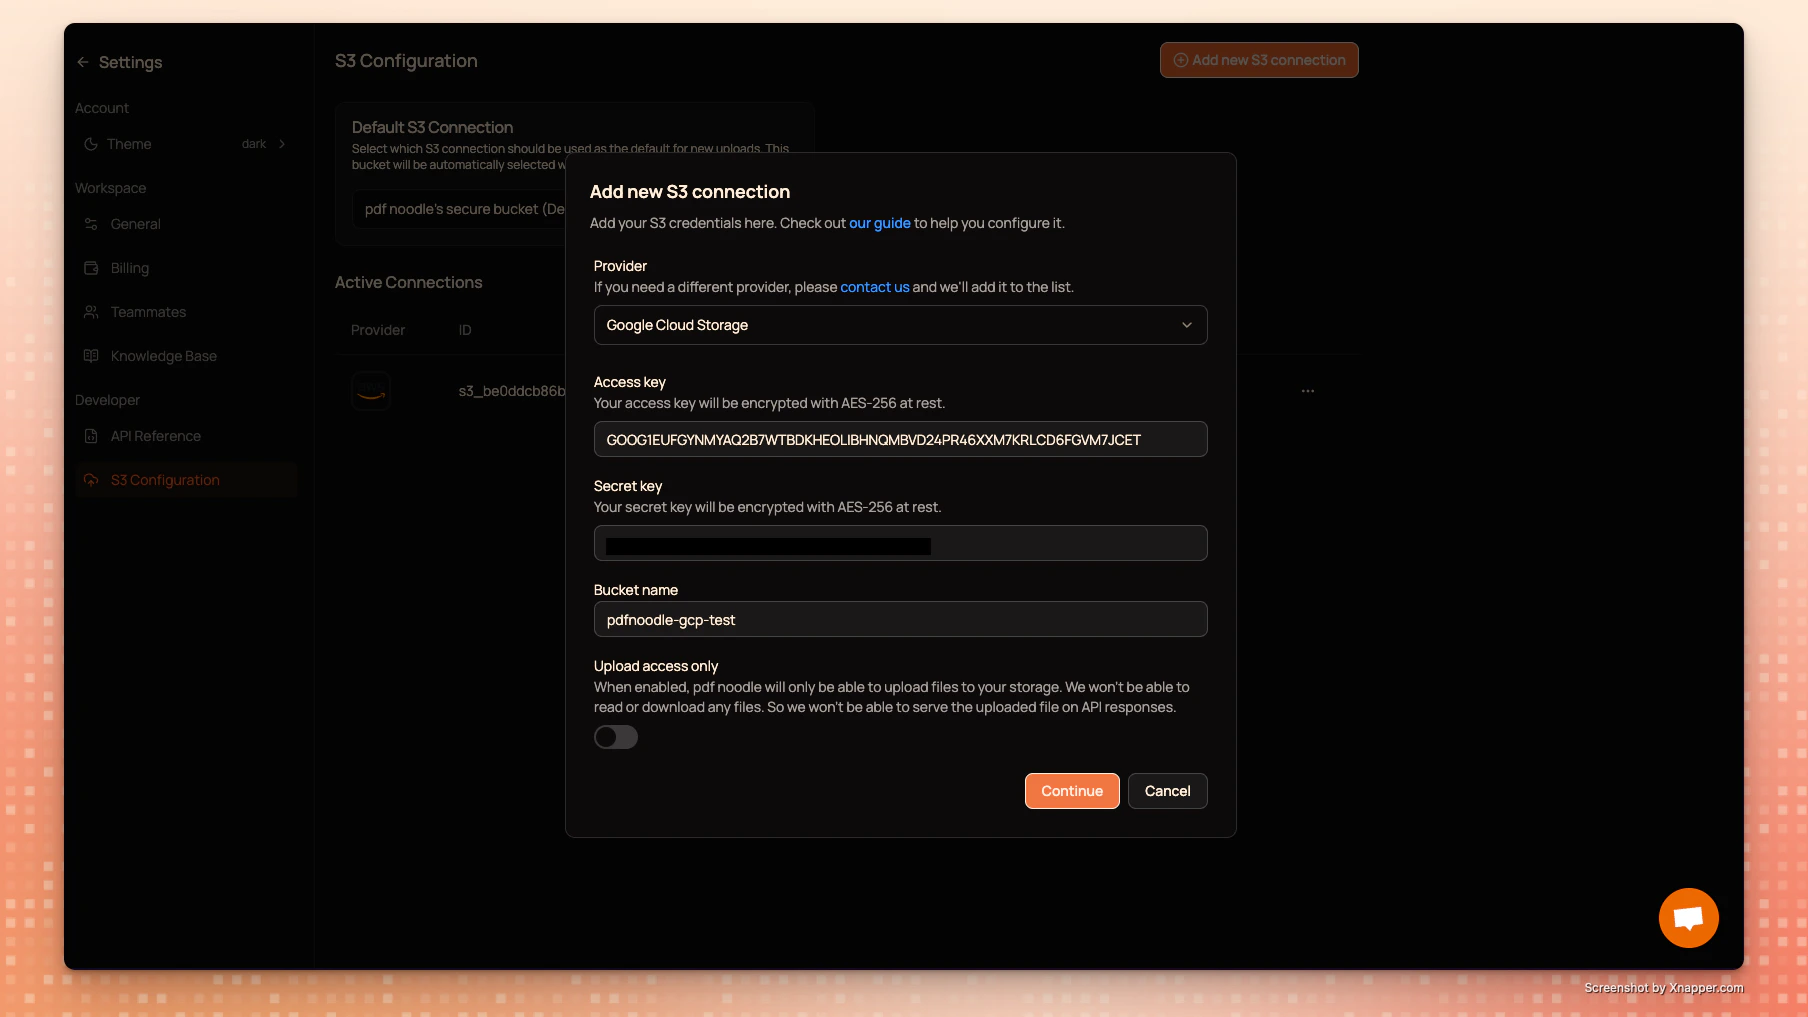 3\. Click Continue. If everything’s configured properly, you’ll see a success message.
pdf noodle will attempt to upload a test file to:
`pdfnoodle_test/delete_me_{date}.txt`
Since we don’t have delete permissions, you’ll need to remove that file manually later.
Hint: If you see an error, double-check your credentials and bucket
permissions.
***
### Step 6: Set as Default Storage
3\. Click Continue. If everything’s configured properly, you’ll see a success message.
pdf noodle will attempt to upload a test file to:
`pdfnoodle_test/delete_me_{date}.txt`
Since we don’t have delete permissions, you’ll need to remove that file manually later.
Hint: If you see an error, double-check your credentials and bucket
permissions.
***
### Step 6: Set as Default Storage
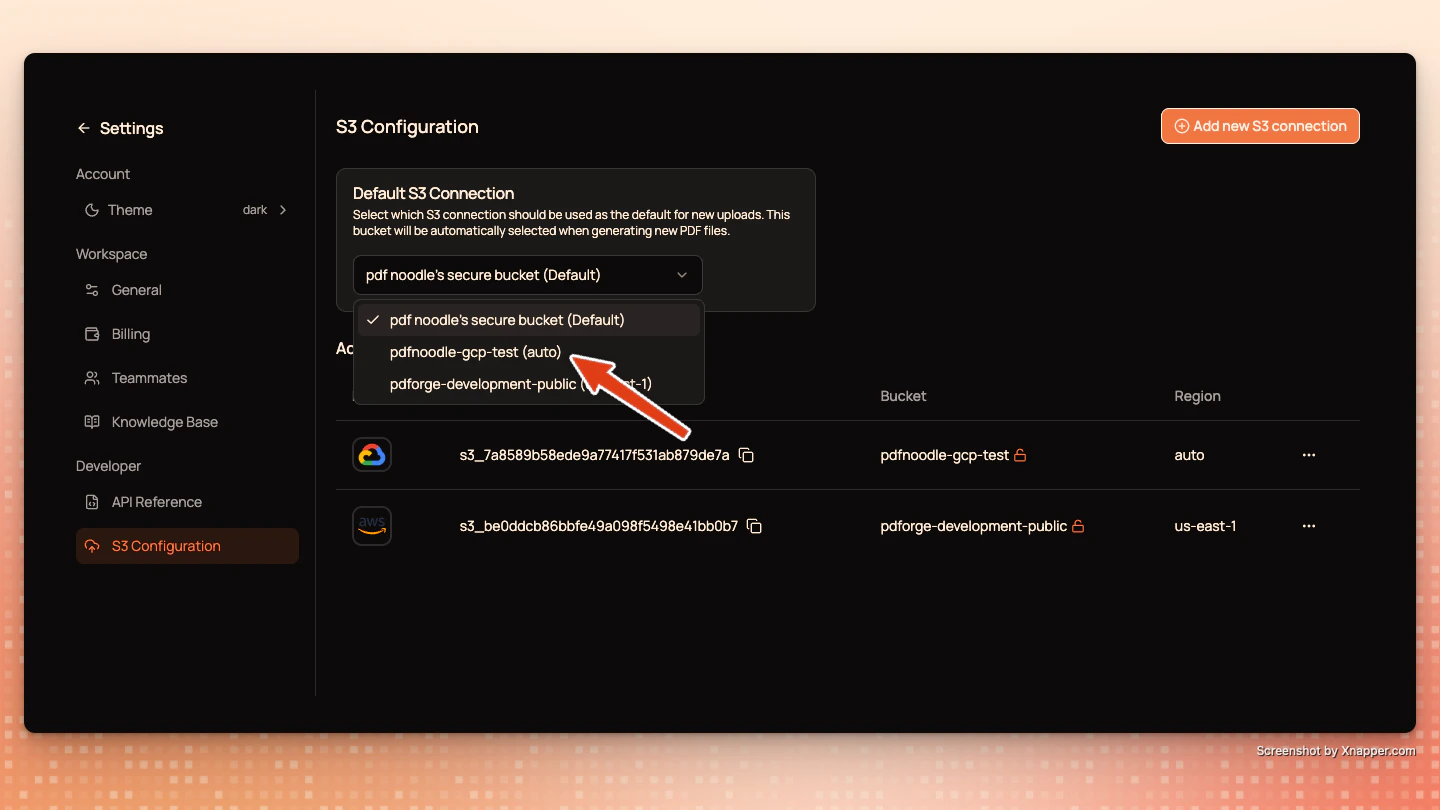 Go back to your S3 settings in pdf noodle and select your new connection as the default bucket. **All future PDFs will now be saved there. 🎉**
**Hint:** You can also set on which `s3_bucket` and `s3_key` you want to save
PDFs individually, by passing an extra parameter. [You can see more about it
here](https://app.gitbook.com/o/6WKbIlYX72bYYe0wYnOa/s/5XMpOekw27OhJlJjfwYv/)!
Go back to your S3 settings in pdf noodle and select your new connection as the default bucket. **All future PDFs will now be saved there. 🎉**
**Hint:** You can also set on which `s3_bucket` and `s3_key` you want to save
PDFs individually, by passing an extra parameter. [You can see more about it
here](https://app.gitbook.com/o/6WKbIlYX72bYYe0wYnOa/s/5XMpOekw27OhJlJjfwYv/)!