> ## Documentation Index
> Fetch the complete documentation index at: https://docs.pdfnoodle.com/llms.txt
> Use this file to discover all available pages before exploring further.
# Configuring Amazon S3
Setting up S3 buckets and IAM credentials can be a bit tricky, so we’ve broken the process down step-by-step:
### Overview
1\. Create a new S3 bucket (private or public)
2\. Create an IAM user
3\. Create an IAM group
4\. Add the user to the group
5\. Attach a policy that allows uploads to your bucket
6\. Generate access and secret keys
7\. Add the S3 connection in pdf noodle
8\. Set it as your default storage
***
### Step 1: Create an S3 Bucket
1\. In your AWS console, go to the S3 service and click Create bucket.
2\. Enter a bucket name and choose a region (e.g. us-east-1).
3\. We recommend making the bucket private. pdf noodle will use signed URLs to upload files securely.
4\. Click Create bucket to finish.
***
### Step 2: Create an IAM User
1\. In the AWS console, go to IAM > Users and click Create user.
2\. Name the user something like pdfnoodle-s3-user.
3\. On the next step, choose Add user to group and click Create group.
4\. Name the group something like pdfnoodle-uploaders.
5\. Complete the user creation wizard.
***
### Step 3: Add Upload Permissions
1\. Go to the group you just created.
2\. Under the Permissions tab, click Add permissions > Create inline policy.
3\. Switch to the JSON tab and paste the following policy:
**For pdf noodle to only have access to upload files:**
```json theme={null}
{
"Version": "2012-10-17",
"Statement": [
{
"Effect": "Allow",
"Action": ["s3:PutObject"],
"Resource": ["arn:aws:s3:::your-bucket-name/*"]
}
]
}
```
**For pdf noodle to have access have access to upload and get files:**
```json theme={null}
{
"Version": "2012-10-17",
"Statement": [
{
"Effect": "Allow",
"Action": [
"s3:PutObject",
"s3:GetObject"
],
"Resource": "arn:aws:s3:::your-bucket-name/*"
}
]
}
```
Replace your-bucket-name with your actual bucket name.
**Hint:** If you want this user to have access to *all* your buckets (not recommended), use: arn:aws:s3:::\*/\*.
4. Click Review policy, name it (e.g. pdfnoodle-s3-policy), and save.
***
### Step 4: Generate Access Keys
1\. Go back to the IAM user you created.
2\. Under the Security credentials tab, scroll to Access keys.
3\. Click Create access key, selecting Third-party service as the use case.
4\. Copy the Access Key ID and Secret Access Key — you won’t be able to see the secret again.
***
### Step 5: Connect Your Bucket to pdf noodle
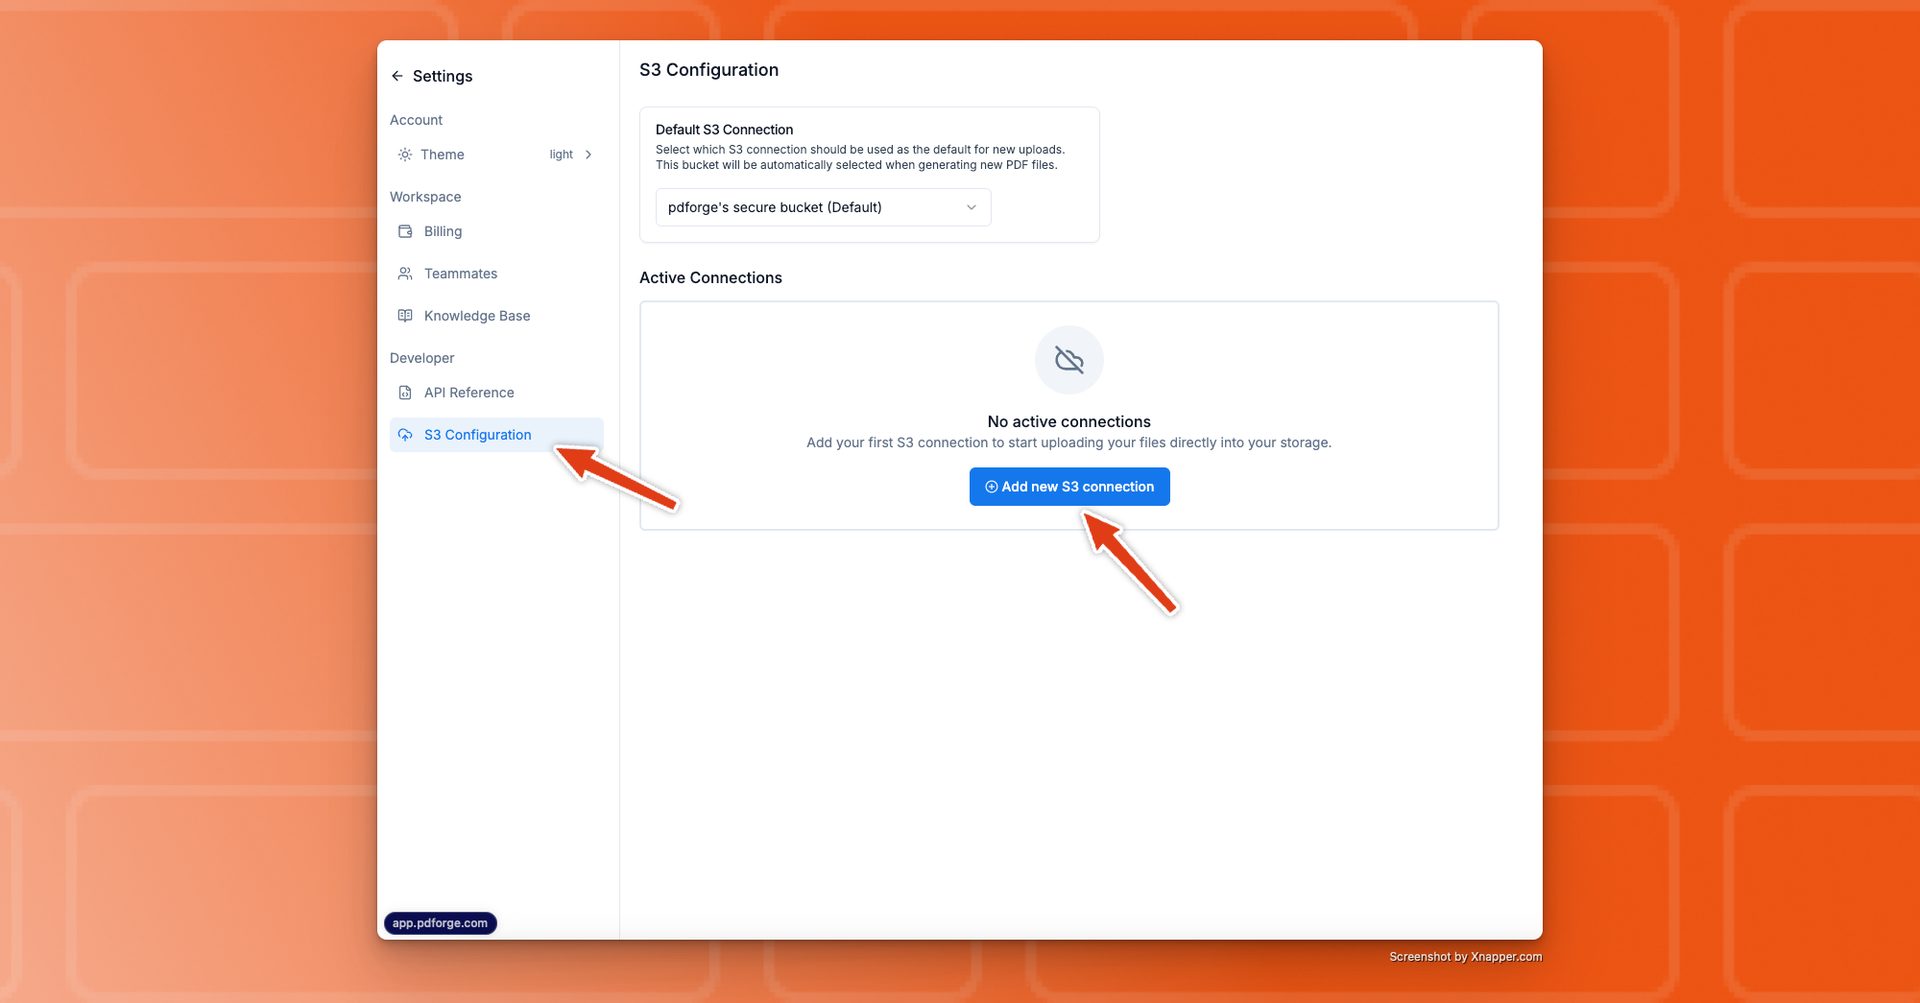 1\. In pdf noodle, go to Settings > S3 Configuration.
2\. Click Add S3 Connection, then enter:
* Provider: AWS
* Access Key and Secret Key
* Bucket Name
* Bucket Region
* *(Optional)*: Enable **Upload access only** if you don’t want pdf noodle to read from the bucket.
**Note:** With **Upload access only** enabled, we won’t return the file in the API response—only its key.
1\. In pdf noodle, go to Settings > S3 Configuration.
2\. Click Add S3 Connection, then enter:
* Provider: AWS
* Access Key and Secret Key
* Bucket Name
* Bucket Region
* *(Optional)*: Enable **Upload access only** if you don’t want pdf noodle to read from the bucket.
**Note:** With **Upload access only** enabled, we won’t return the file in the API response—only its key.
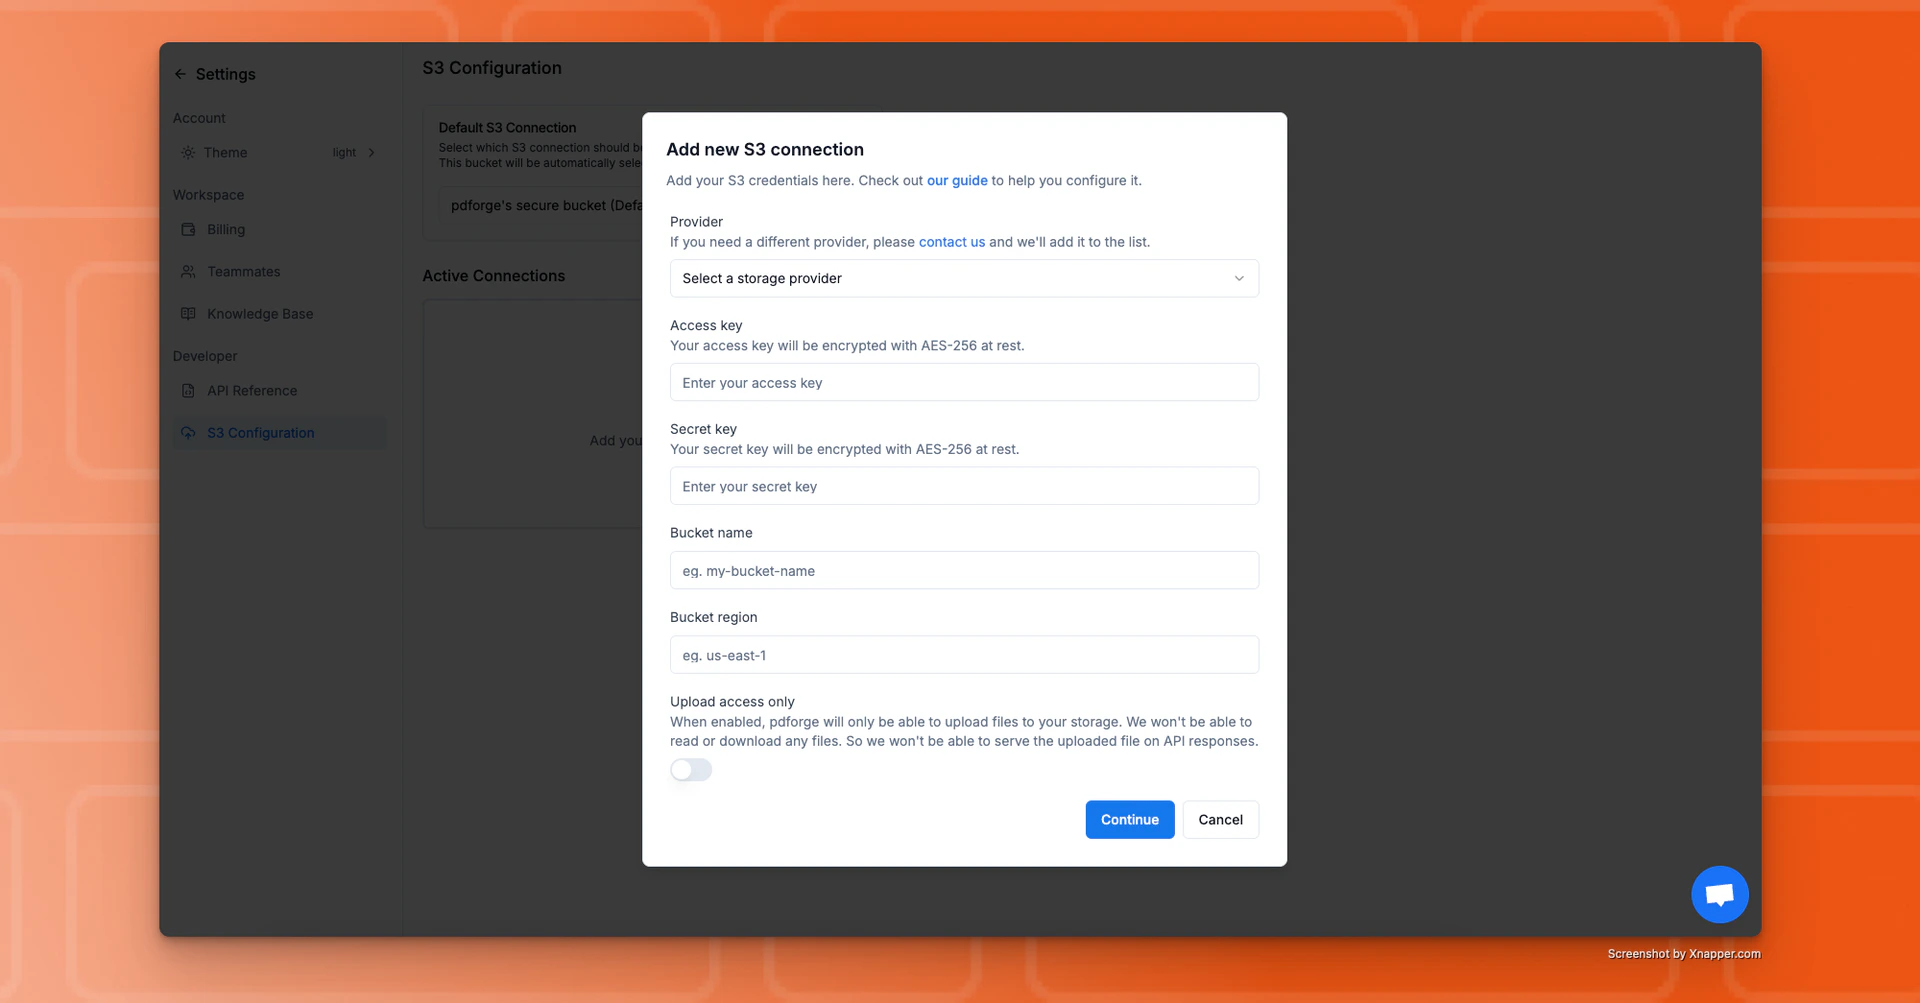 3\. Click Continue. If everything’s configured properly, you’ll see a success message.
pdf noodle will attempt to upload a test file to:
`pdfnoodle_test/delete_me_{date}.txt`
Since we don’t have delete permissions, you’ll need to remove that file manually later.
Hint: If you see an error, double-check your credentials and bucket permissions.
***
### Step 6: Set as Default Storage
3\. Click Continue. If everything’s configured properly, you’ll see a success message.
pdf noodle will attempt to upload a test file to:
`pdfnoodle_test/delete_me_{date}.txt`
Since we don’t have delete permissions, you’ll need to remove that file manually later.
Hint: If you see an error, double-check your credentials and bucket permissions.
***
### Step 6: Set as Default Storage
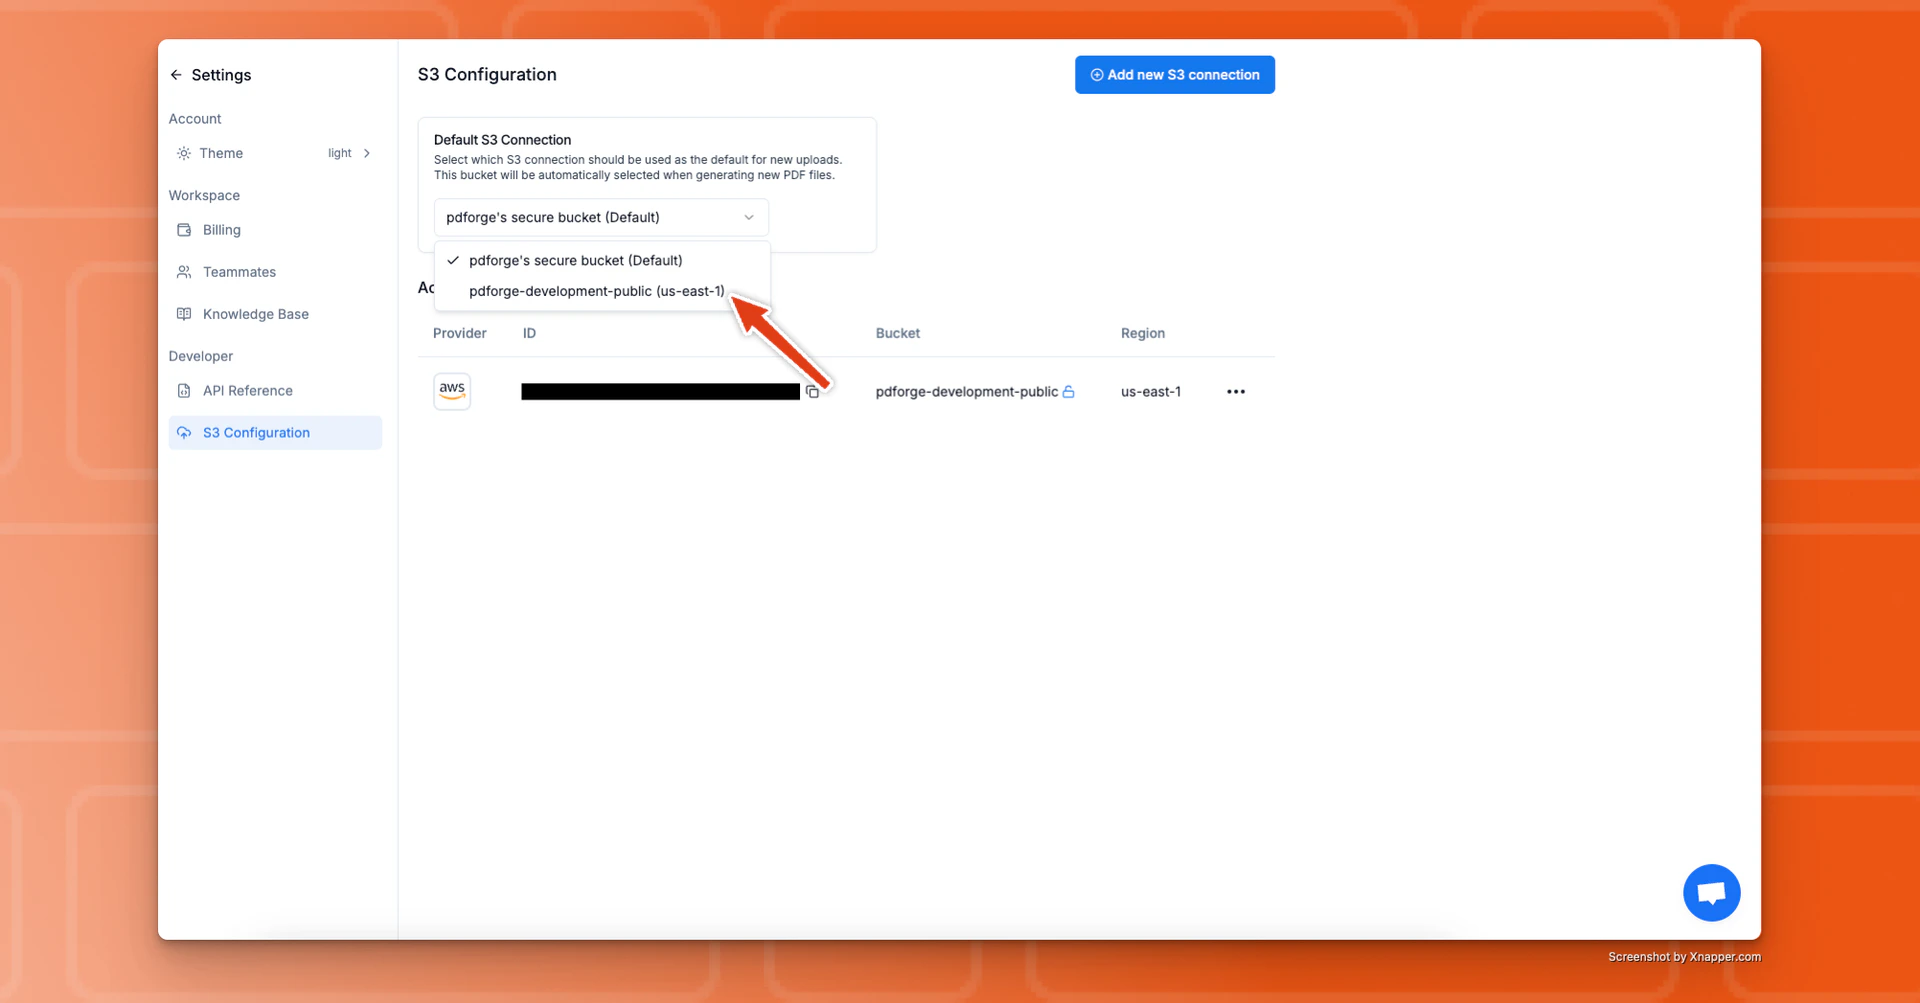 Go back to your S3 settings in pdf noodle and select your new connection as the default bucket. **All future PDFs will now be saved there. 🎉**
**Hint:** You can also set on which `s3_bucket` and `s3_key` you want to save PDFs individually, by passing an extra parameter. [You can see more about it here](https://app.gitbook.com/o/6WKbIlYX72bYYe0wYnOa/s/5XMpOekw27OhJlJjfwYv/)!
Go back to your S3 settings in pdf noodle and select your new connection as the default bucket. **All future PDFs will now be saved there. 🎉**
**Hint:** You can also set on which `s3_bucket` and `s3_key` you want to save PDFs individually, by passing an extra parameter. [You can see more about it here](https://app.gitbook.com/o/6WKbIlYX72bYYe0wYnOa/s/5XMpOekw27OhJlJjfwYv/)!